Accounts and Cryptographic Keys
The Casper blockchain uses an on-chain account-based model, uniquely identified by an AccountHash derived from a specific PublicKey. The AccountHash is a 32-byte hash derived from any of the supported PublicKey variants below to standardize keys that can vary in length.
By default, a transactional interaction with the blockchain takes the form of a Deploy cryptographically signed by the key-pair corresponding to the PublicKey used to create the account.
The Casper platform supports two types of keys for creating accounts and signing transactions:
- Ed25519 keys, which use the Edwards-curve Digital Signature Algorithm (EdDSA) and are 66 bytes long
- Secp256k1 keys, which use the Elliptic Curve Digital Signature Algorithm (ECDSA) with the P-256 curve; they are 68 bytes long and are also found on the Ethereum blockchain
You can generate keys using both formats, and it is also possible to work with existing Ethereum keys.
You can also generate an account hash from a public key with the Casper command-line client.
Creating Accounts and Keys
When you create an account on the Casper blockchain, a cryptographic key-pair will be created when using either the Casper command-line client or a block explorer.
SAVE your keys to a safe place, preferably offline.
Option 1: Generating keys using the Casper Client
This option describes how you can use the Casper command-line client to set up an account using either key type.
EdDSA Keys
The command-line client generates EdDSA keys by default. Use the command below to create the account.
mkdir ed25519-keys
casper-client keygen ed25519-keys/
tree ed25519-keys/
Sample output of the tree command shows the contents of the ed25519-keys folder:
ed25519-keys/
├── public_key.pem
├── public_key_hex
└── secret_key.pem

0 directories, 3 files
Here are some details about the files generated:
public_key.pemis a PEM-encoded public keypublic_key_hexis a hexadecimal-encoded string of the public keysecret_key.pemis the PEM-encoded secret key
The public-key-hex for Ed25519 keys starts with 01 and is 66 bytes long:
cat ed25519-keys/public_key_hex
011724c5c8e2404ca01c872e1bbd9202a0114e5d143760f685086a5cffe261dabd
ECDSA Keys
To create Secp256k1 keys, which use the ECDSA algorithm with the P-256 curve, follow these steps:
mkdir secp256k1-keys
casper-client keygen -a secp256k1 secp256k1-keys/
tree secp256k1-keys/
Sample output of the tree command shows the contents of the secp256k1-keys folder:
secp256k1-keys/
├── public_key.pem
├── public_key_hex
└── secret_key.pem

0 directories, 3 files
The public-key-hex for Secp256k1 keys starts with 02 and is 68 bytes long:
cat secp256k1-keys/public_key_hex
020287e1a79d0d9f3196391808a8b3e5007895f43cde679e4c960e7e9b92841bb98d
After generating keys for the account, you may add funds to the account's purse to finish the account creation process.
Option 2: Generating keys using a block explorer
This option is available on networks that have a block explorer.
For instance, on the official Testnet, the CSPR.live block explorer is available, and the following instructions assume you are using it.
Start by creating an account using the Casper Wallet, Ledger, or Torus Wallet.
The Casper Signer has been replaced with the Casper Wallet and will be deprecated. We recommend migrating all your Casper accounts to the Casper Wallet as outlined here.
Funding your Account
Once you create your account, you can fund the account's main purse to finish the process of setting it up.
Until you fund your account's main purse, it does not exist on the blockchain.
Working with Existing Ethereum Keys
You can also use existing Ethereum keys in Casper. Here is an example set of Ethereum keys and their corresponding address:
Address:0x7863B6F7232D99FF80B74E4C8BB3BEE3BDE0291F
Public key:0470fecd1f7ae5c1cd53a52c4ca88cd5b76c2926d7e1d831addaa2a64bea9cc3ede6a8e9981c609ee7ab7e3fa37ba914f2fc52f6eea9b746b6fe663afa96750d66
Private key:29773906aef3ee1f5868371fd7c50f9092205df26f60e660cafacbf2b95fe086
To use existing Ethereum keys, the Casper virtual machine (VM) needs to know that the key is a Secp256k1 type. To achieve this, we will prefix the public key hex with 02, as shown in the example below.
The Casper command-line client provides an example of how this works.
Example:
The following transaction sends 10 CSPR.
casper-client transfer \
--transfer-id 1234567 \
--node-address http://localhost:7777 \
--chain-name casper \
--target-account 020470fecd1f7ae5c1cd53a52c4ca88cd5b76c2926d7e1d831addaa2a64bea9cc3ede6a8e9981c609ee7ab7e3fa37ba914f2fc52f6eea9b746b6fe663afa96750d66 \
--amount 10000000000 \
--secret-key <path-to-secret_key.pem> \
--payment-amount 100000000
The payment amount varies based on each deploy and network chainspec.
The Casper command-line client requires the secret key in PEM format to send a Deploy from this account. If you want to use existing Ethereum keys with the command-line client, a conversion to PEM format is needed.
The following example is a JS script that generates a PEM file, using a key encoder and Node.js. To install these components, do the following:
sudo apt install nodejs
npm install key-encoder
Then create the JS script convert-to-pem.js using vi or nano, and include this content:
var KeyEncoder = require("key-encoder"),
    keyEncoder = new KeyEncoder.default("secp256k1");
let priv_hex = "THE SECRET KEY TO ENCODE";
let priv_pem = keyEncoder.encodePrivate(priv_hex, "raw", "pem");
console.log(priv_pem);
Then run the script using Node.js and name the secret key.
node convert-to-pem.js > eth-secret.pem
To view the secret key, use cat <filename>:
cat eth-secret.pem
Below is the sample output showing the contents of the secret key.
-----BEGIN EC PRIVATE KEY-----
MHQCAQEEIBjXY+7xZagzTjL4p8bGWS8FPRcW13mgytdu5c3e556MoAcGBSuBBAAK
oUQDQgAEpV4dVaPeAEaH0VXrQtLzjpGt1pui1q08311em6wDCchGNjzsnOY7stGF
tlKF2V5RFQn4rzkwipSYnrqaPf1pTA==
-----END EC PRIVATE KEY-----
Option 3: Generating keys using OpenSSL
You can generate keys without the Casper client using the openssl cryptography toolkit. The commands below are valid only for generating Ed25519 keys on a Linux operating system.
Generating the secret_key.pem file
openssl genpkey -algorithm ed25519 -out secret_key.pem
Generating public keys from the secret_key.pem file
For default Ed25519 keys, you can generate the public_key.pem and public_key_hex using these commands:
openssl pkey -in secret_key.pem -pubout -out public_key.pem

{ echo -n 01; openssl pkey -outform DER -pubout -in "secret_key.pem" | tail -c +13 | openssl base64 | openssl base64 -d | hexdump -ve '/1 "%02x" ' | tr -d "/n"; } > public_key_hex
Generating an Account Hash
To generate the account hash for a public key, use the account-address option of the Casper client. The argument for the public-key must be a properly formatted public key. The public key may also be read from a file, which should be one of the two files generated via the keygen command: public_key_hex or public_key.pem.
casper-client account-address --public-key <FORMATTED STRING or PATH>
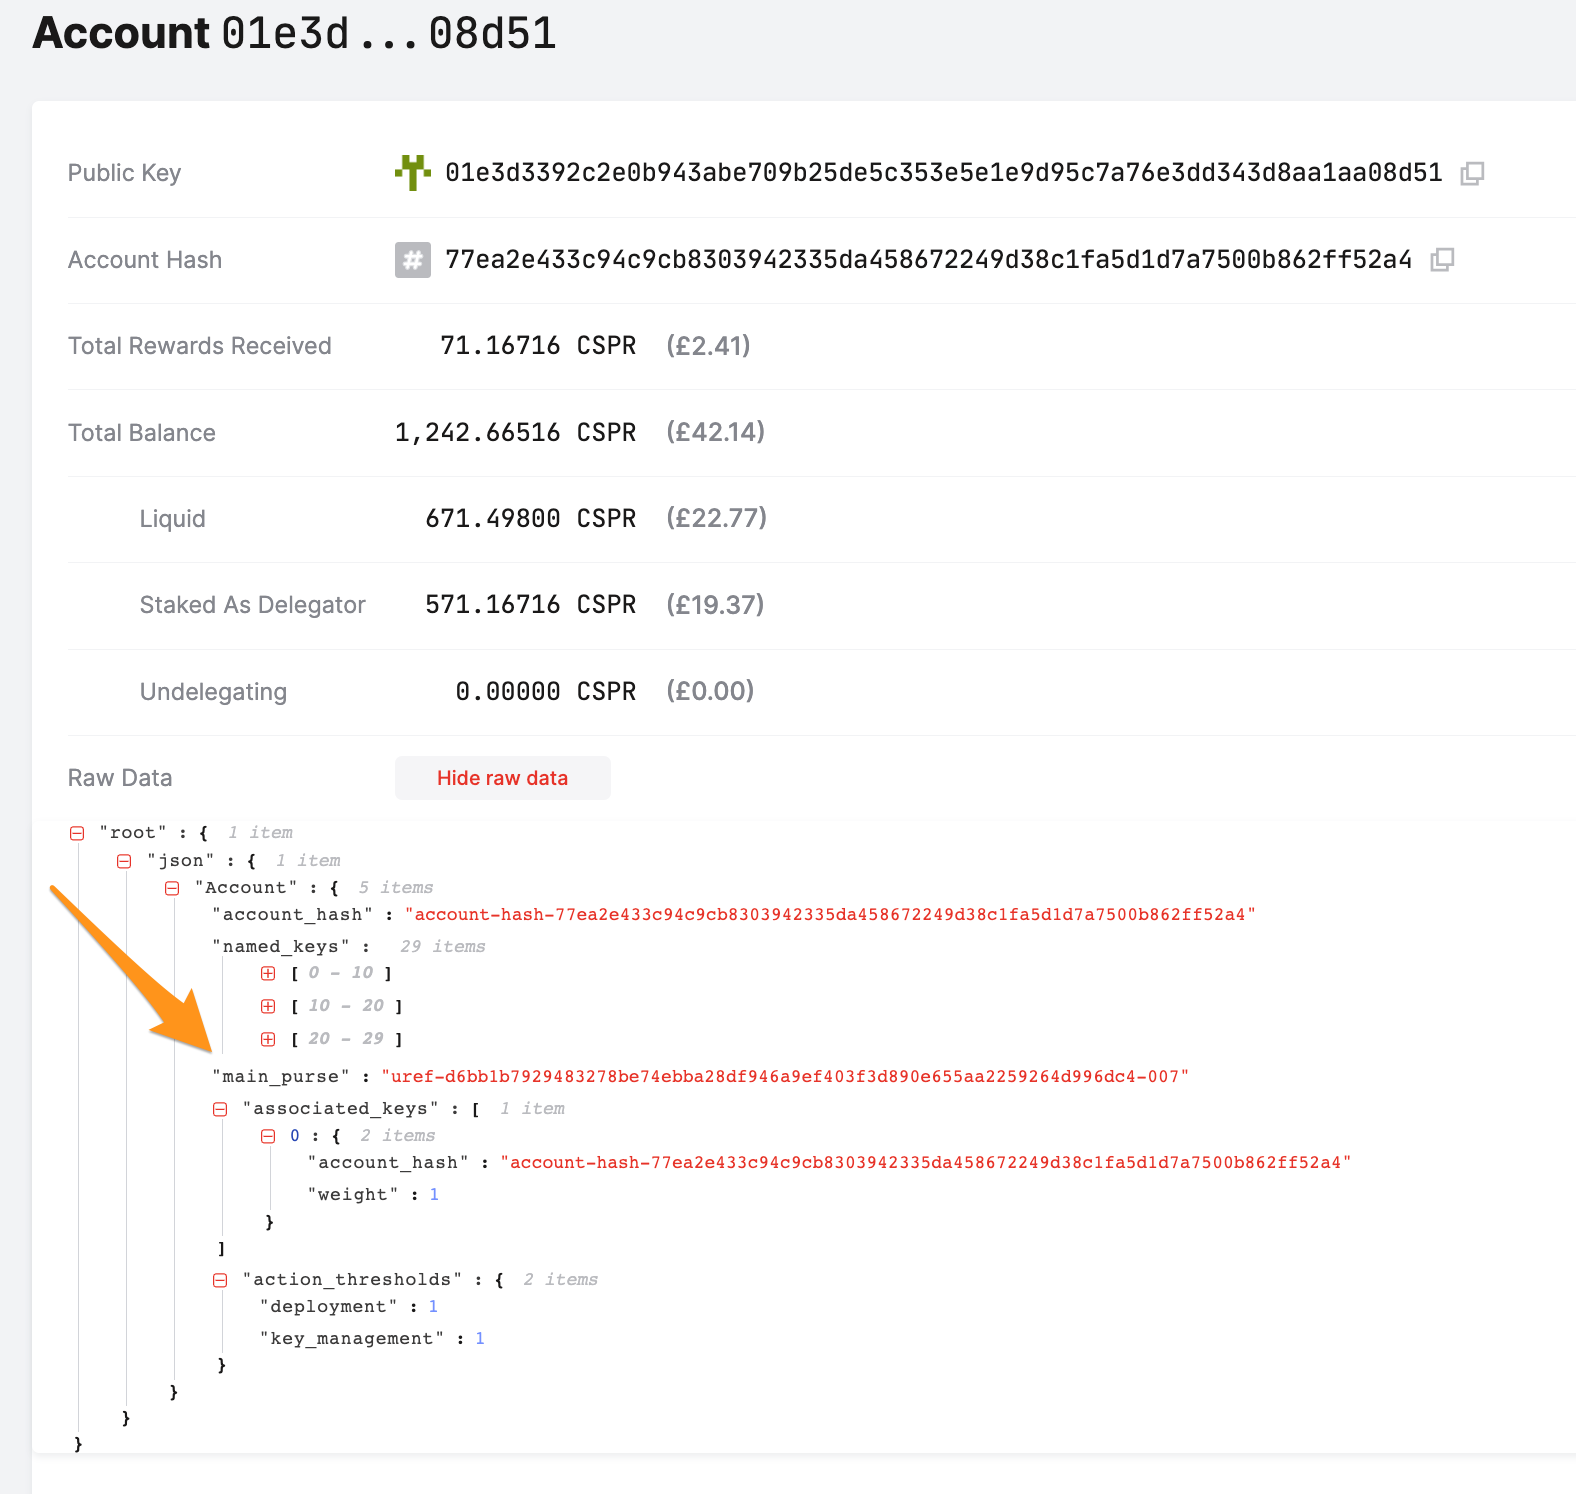
Finding the Main Purse URef
You can use the Casper CLI client or a block explorer to find the URef identifying an account's main purse.
Using the Casper CLI client
With the casper-client, use the get-account-info subcommand.
casper-client get-account-info \
--node-address <HOST:PORT>  \
--public-key <FORMATTED STRING or PATH>
node-address- An IP address of a peer on the network. The default port of nodes' JSON-RPC servers on Mainnet and Testnet is 7777public-key- This must be a properly formatted public key. The public key may instead be read in from a file, in which case, enter the path to the file as the argument. The file should be one of the two public key files generated via thekeygensubcommand; "public_key_hex" or "public_key.pem"
Sample command and output
casper-client get-account-info --node-address http://65.21.75.254:7777  --public-key 0202ceafc0aa35f5a7bdda22f65c046b9b30b858459e18d3670f035839ad887fe5db
{
  "id": -2018234245556346849,
  "jsonrpc": "2.0",
  "result": {
    "account": {
      "account_hash": "account-hash-0ea7998b2822afe5b62b08a21d54c941ad791279b089f3f7ede0d72b477eca34",
      "action_thresholds": {
        "deployment": 1,
        "key_management": 1
      },
      "associated_keys": [
        {
          "account_hash": "account-hash-0ea7998b2822afe5b62b08a21d54c941ad791279b089f3f7ede0d72b477eca34",
          "weight": 1
        }
      ],
      "main_purse": "uref-974019c976b5f26412ce486158d2431967af35d91387dae8cbcd43c20fce6452-007",
      "named_keys": []
    },
    "api_version": "1.4.15",
    "merkle_proof": "[29712 hex chars]"
  }
}
Run the following help command for more details:
casper-client get-account-info --help
Using a block explorer
Using the block explorer for Mainnet or Testnet, open the Account in question, and expand the Raw Data section. Look for the main_purse field and find the corresponding URef. If you do not see data in the Raw Data section, then the account has not been funded yet.